Get Details
The Get Details activity will extract relevant details of the selected/focused element, such details as ‘is available’ 'is enabled’, ‘is offscreen’, ‘is a password’. In the example below, we use the 'Get Details' activity to check whether the ‘Finish’ installer button is available, and is enabled, to know when the button is active in order to press it to finialise an installation.

Designer Properties#
- Path to element Points to the location of the application window on the desktop containing the element required. It is used to find the element to extract the text from.
- Element details Contains the details to find the element. This may be the automation id, class name, name.
- Stop recording manually Controls how the recording is stopped. When checked, the recording will be stopped only when the 'Stop recording' button is pressed, otherwise the recording is stopped with the following combination CONTROL followed by left/right ClickPath to element and Element details will be set to the last element that was clicked(left or right).
- Select Element Starts the recording of a target element on a desktop application which will receive the click event. The element can be selected using CONTROL followed by left/right Click. If we use this option, Path to element and Element details will be set to the last element clicked while CONTROL key was down, and the recording will be stopped, otherwise Path to element and Element details will be set to the last element clicked(left/right) after either STOP button was pressed, or the STOP hot key was used(ESC by default).
Properties#
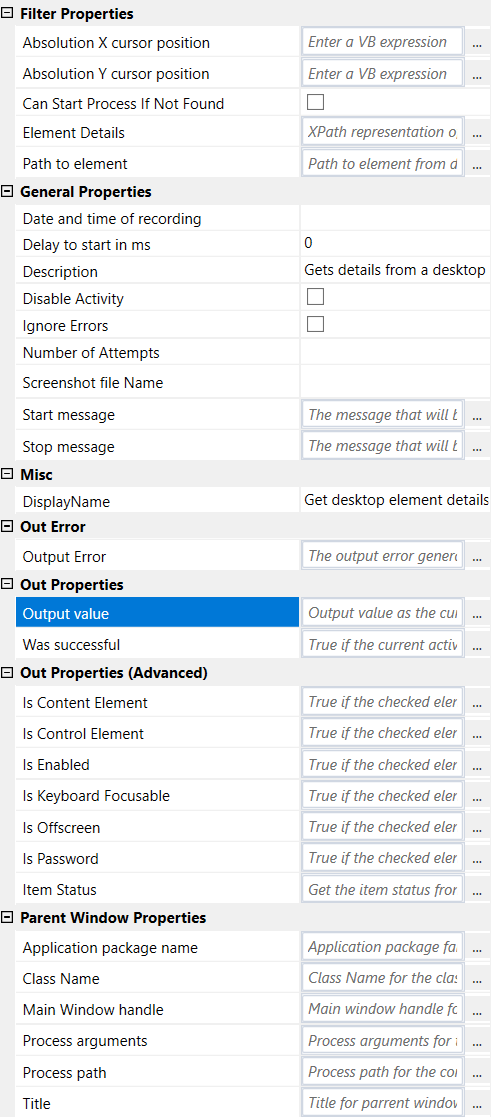
Filter Properties#
- Absolute X cursor position See Filter Properties.
- Absolute Y cursor position See Filter Properties.
- Can Start Process If Not Found See Filter Properties.
- CV Threshold See Filter Properties.
- Element details See Designer Properties above.
- Element Index See Designer Properties above.
- Path to element See Designer Properties above.
- Stop Id preprocessing See Filter Properties.
- Use CV See Filter Properties.
- Use Relative position See Filter Properties.
General Properties#
See General Properties.
Misc#
See Misc.
Out Error#
See Out Error.
Out Properties (Advanced)#
- Bounding Rectangle Element bound rectangle in screen coordinates. It can be used to click an element by position.
- Is Content Element Returns true if the selected element is a content element or false otherwise. To use this state, we must set this value to variable of type bool which may be created under Variables at the bottom of the workflow.
- Is Control element Returns true if the selected element is a control element or false otherwise. To use this state, we must set this value to variable of type bool which may be created under Variables at the bottom of the workflow.
- Is Enabled Returns true if the selected element is enabled or false otherwise. To use this state, we must set this value to variable of type bool which may be created under Variables at the bottom of the workflow.
- Is Keyboard Focusable Returns true if the selected element is focusable or false otherwise. To use this state, we must set this value to variable of type bool which may be created under Variables at the bottom of the workflow.
- Is Offscreen Returns true if the selected element is offscreen or false otherwise. To use this state, we must set this value to variable of type bool which may be created under Variables at the bottom of the workflow.
- Is Password Returns true if the selected element is a password field or false otherwise. To use this state, we must set this value to variable of type bool which may be created under Variables at the bottom of the workflow.
- Item Status Returns the status of the selected element, like Connected, Busy. To use this state, we must set this value to variable of type string which may be created under Variables at the bottom of the workflow.
Parent Window Properties#
Example#
Automating Rinkt Robot installation
In this sample, the activity will automate the Rinkt Robot installer by clicking on the ‘Next’ button using the Mouse activity, then wait until the ‘Finish’ button becomes available and enabled, before we finialise the installation by clicking on the ‘Finish’ button.
note
Please ensure that you change the File Path to a valid path on your desktop.
The variable ‘Number of Attempts’ is set to 1 for ‘Get Details’ activity on the ‘Finish’ button. This ensures that the activity checks the enabled state of the ‘Finish’ button only once before retrying.